You’ve drafted the plans. You’ve sketched the dimensions of the frame, drawn rectangles for the running skylights along the edge of the ceiling, and marked the corner where the wood stove your grandmother gave you will sit. Or maybe you’ve done none of that. Maybe you bought a tiny home and it’s one degree away from perfect. Some questions that may arise:
- What is the best method for heating and cooling your tiny home?
- Will you install flexible ductwork out of sight; or are you feeling the appeal of a metal trunk running industrial-style along the center of the ceiling?
- In which wall will you cut a hole for that window unit you’ve been eyeing?
- What are the average summer and winter temperatures where your tiny palace will reside? Or is your tiny house a mobile masterpiece, needing preparation for a variety of climates?
Whether you are dipping your toes into the minimalist movement, committing to the trend of everyday space rather than someday space, or plunging headlong into homesteading, this guide will cover different ways of heating and cooling your tiny home so you can make an informed decision based on cost, aesthetics, and square footage. The goal of this guide is to distill a vast amount of information into one convenient location. It is our hope that this guide will make you feel more comfortable in the decision making process, and that the article you read will be from the comfort of your tiny home.
Table of Contents
- Heating and Cooling Terminology
- British Thermal Units (BTU)
- Watts, Volts, and Amps
- Square Foot to BTU Conversion Chart
- Energy Efficient Ratio (EER)
- Seasonal Energy Efficient Ratio (SEER)
- Refrigerant Cycle and Electric Heating
- Air Conditioning Cycle
- Heating Cycle
- Electric Heating
- Heating and Cooling Options
- Ductless Mini-Split Air Conditioner
- Wood Stove
- Through-the-Wall Unit (TTW)
- Portable Air Conditioner
- Packaged Terminal Air Conditioner (PTAC)
- Vertical Terminal Air Conditioner (VTAC)
- Central Heating and Air
- Energy Effective Strategies
- Air Transmission
- Insulation
- Skirting and Windows
- Bringing It All Together
An important component of heating and cooling any space involves a cursory understanding of British Thermal Units (BTU), wattage, amps, volts, and Energy Efficient Ratio (EER).
British Thermal Units
Let’s start with British Thermal Units (BTU). One BTU is equivalent to the thermal energy required to heat one pound of water one degree Fahrenheit. In air conditioning, you “condition” the air by removing thermal energy from the space. The higher the number of BTUs, the larger the capacity for either heating or cooling a given space.
Watts, Volts, and Amps
If you know any two of these three terms, the remaining can be calculated with basic math, as follows:
- Wattage: is a measurement of the amount of power required to operate an electrical appliance or device. There is a direct correlation between wattage and energy- the more wattage used, the more energy used; the less wattage used, the less energy used.
- Volts: are the measure of the force or pressure under which electricity flows. Basically, volts are the measure of the electricity you have available for your appliance or device. The typical range is 110-240 volts.
- Amperes: often shortened to amps, are a measure of the current flow rate of electrons. Think of it like a river flowing at a constant rate. That rate could be weak (a creek) or strong (a flooded river).
Square Foot to BTU Conversion Chart
| Tiny Home Size | Size of Unit Required |
|---|---|
| <150 sq. feet | 5,000 BTU |
| 150-250 sq. feet | 6,000 BTU |
| 250-300 sq. feet | 7,000 BTU |
| 300-350 sq. feet | 8,000 BTU |
| 350-400 sq. feet | 9,000 BTU |
| 400-450 sq. feet | 10,000 BTU |
| 450-550 sq. feet | 12,000 BTU |
| 550-700 sq. feet | 14,000 BTU |
| 700-1,000 sq. feet | 18,000 BTU |
| 1,000-1,400 sq. feet | 24,000 BTU |
Additionally, you can use this calculator to hone in on your specific numbers.
Energy Efficient Ratio
The Energy Efficient Ratio (EER) is important for selecting the correct HVAC for your tiny home. Air conditioner EER = BTU/wattage consumed. Look for the yellow Energy Guide Label on these products that lists the numbers, like a nutrition label on food products. Example: A 550 square foot tiny home has a BTU rating of roughly 12,000. A 12,000 BTU PTAC, or other portable air conditioner can use up to 1,400 watts. The less wattage used, the higher the EER In our example; 12,000 BTU/1,400 watts = 8.5 Therefore, its EER equals 8.5. Every one point increase in your EER equates to about a 10 percent reduction in cooling costs, i.e. the unit will not run as long, costing you less. This is the magic behind a cozy room in the winter, a cool room in the summer, and a cheap bill throughout the year. Seasonal Energy Efficient Rating
Seasonal Energy Efficient Rating
As mentioned before, it’s important to take into consideration the amount of sunlight coming into your tiny home, the climate of your area, and whether you have other heating or cooling devices in the home like a stove or kerosene heater. However, be careful of the Seasonal Energy Efficient Ratio (SEER) rating. It’s a pesky rating that only computes the cooling power of a unit, regardless of where your tiny house will be located. Think about that for a moment. Say you live in Knoxville, Tennessee, where the summers frequently hover in the 90s, but your father lives in upper Maine. Do you think you and your father require the same amount of power to cool your respective homes (all other things being equal)? Of course not! SEER is sometimes used by salespeople to make you think you are getting a more efficient unit. There is a slight caveat. The SEER rating is commonly calculated on the average summer temperature of 83 degrees, which means if you live in an area where that is the average summer temperature, then the SEER rating is right for your home. If your area’s average is hotter than 83 degrees, subtract 2 SEER points for every 10 degree jump. For example if summer temperatures around you regularly hit 93 degrees, an HVAC unit advertised with a rating of 14 SEER is, in fact, a 12 SEER unit for your area.
Refrigerant Cycle and Electric Heating
Now that our terms have been defined, let’s talk about the cycle of operations that heat and cool your tiny home.
Air Conditioning Cycle
You are standing in your tiny home in the summer on an 87 degree day. It is quite hot and muggy; the unit has been off. You turn the unit on. The fan whirs and the air begins to be conditioned via the refrigeration process. Step 1: The system refrigerant (commonly Freon or Puron) begins the cycle in a gaseous state. The compressor pumps the refrigerant gas up to a high pressure and temperature, compressing it. Step 2: The gas enters a heat exchanger where it loses heat to the outside world, cools, and condenses into a liquid via the condenser. Note: the liquid is cold in this phase of the cycle. Step 3: The liquid refrigerant is returned to another heat exchanger where it evaporates. As it does so, it absorbs heat from the inside air (where it is hot and muggy), returns to the compressor, and repeats the cycle- effectively cooling your tiny home.
Heat Pump Cycle
Now imagine you are standing in the same tiny home in the winter. The temperature is a chilly 55 degrees, that is, chilly to someone raised below the Mason-Dixon line. You turn the unit on. Step 1: The system refrigerant begins the cycle in a gaseous state. The compressor pumps the refrigerant gas up to a high pressure and temperature, compressing it Step 2: The gas enters a heat exchanger where it absorbs heat from the cooler outside world, or even the ground, and condenses into a liquid phase. Note: the liquid is hot in this phase of the cycle. Step 3: The liquid refrigerant is returned to the heat pump/exchanger where it evaporates. As it does so it absorbs cold from the inside air, returns to the compressor, and repeats the cycle- effectively heating your tiny home. These cycles continue until your room temperature reaches the desired temperature set on your thermostat. The fewer cycles repeated, the less energy used; the less energy used, the less you pay monthly. Note: The addition of other parts, such as a dehumidifier, will add steps to this cycle.
Electric Heating
The other major way to heat and cool a space artificially is by using the resistive electric heating process. The heating element inside every electric heater is an electrical resistor which works on the principle of Joule heating- an electric current passing through a resistor will convert that electrical energy into heat energy. This is measured in joules. As a heating technology, Joule heating has a coefficient of performance of 1.0. This means that every joule of electrical energy supplied produces one joule of heat. In contrast, a heat pump can have a coefficient of more than 1.0 since it moves additional thermal energy from the environment to the heated item (Note: this means a heat pump is more energy efficient than an electric resistive heating element, all other factors being equal). Most HVAC units use electric heating as a backup to a heat pump. This only comes on when the heat pumps go into the defrost cycle or when the temperature gets really cold outside and the heat pump can’t keep the temperature stable in your home.
There are a wide range of heating and cooling options that have applications in tiny homes. In this section, we’ll take a look at seven options comparing them across a variety of criteria and discussing items that should be considered for each option.
| Electrical Requirements | Budget Cost | Midrange Cost | High-End Cost | Installation Cost | Maintenance | Preferred Climate | |
|---|---|---|---|---|---|---|---|
| Ductless Mini-Split | 110 – 220 volts | $1,800 | $5,600 | $8,250 | $$$$ | Low | Any |
| Wood Stove | none | $300 | $1,000 | $4,000 | $$ | Medium | Cold |
| Through-the-Wall Unit | 115 – 240 volts | $400 | $500 | $800 | $ | Low | Warm |
| Portable Air Conditioner | 110 – 120 volts | $250 | $350 | $600 | None | None | Mild |
| PTAC | 230 – 265 volts | $300 | $700 | $1,500 | $$ | Low | Any |
| VTAC | 208 – 230 volts | $1,600 | $2,000 | $2,800 | $$$ | Medium | Any |
| Central Heating and Air | 220 – 240 volts | $1,400 | $2,000 | $2,500 | $$$$ | Low | Any |
Ductless Mini-Split Air Conditioner
At a Glance:
- Most popular choice
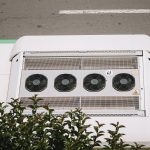
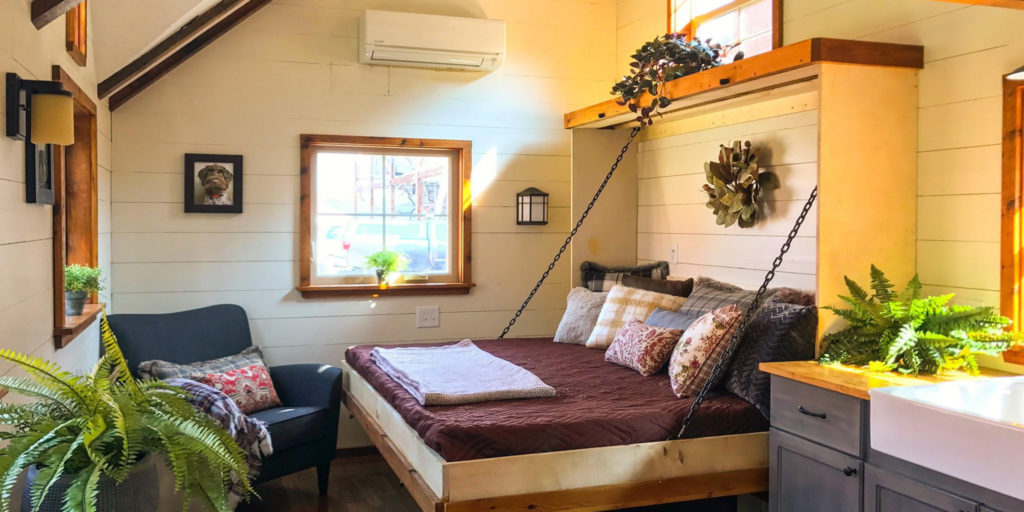
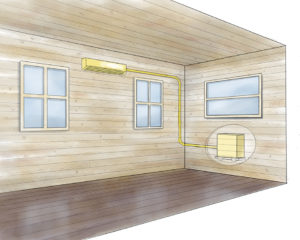
- Made up of two parts: wall-mounted evaporator and outdoor condenser
- Requires fan or air exchanger
- Optional: Duct chase for loft
This is the most popular way to heat and cool your tiny home. Mini-split systems have two components—an outdoor condenser and an indoor air-handling unit. The indoor air-handling unit acts as the evaporator in the refrigerant cycle. The outdoor condenser is linked to the air-handling unit via conduit consisting of refrigerant, electric, and drain lines. This conduit is why you don’t need ductwork; thin copper tubing pumps refrigerant directly into the wall-mounted unit.
“If you have access to electricity and want a two-for-one compact appliance that really works, you should definitely consider a mini-split,” – recommended Jenna, who writes the blog Tiny House, Giant Journey.
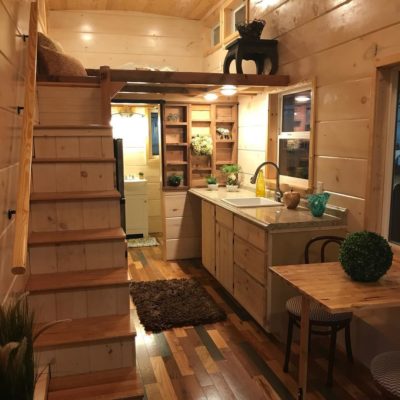
 One major advantage for using a mini-split system is the relatively small space they take up inside the tiny home. The evaporator is mounted out of the way on an indoor wall, and the condenser is placed outside. If installed properly, these systems can easily heat and cool a tiny home in even the roughest of weather. According to Randy Jones, owner of Incredible Tiny Homes, you will need to incorporate a fan. Moving air within the house is a necessary step to keep windows from fogging and to prevent odors from lingering. This can be achieved by incorporating any type of fan, or through the use of an air exchanger. An air exchanger is a simple device that creates a channel for stale air to exit the house and to bring fresh outside air into the house.. If you are using a loft, you will want to consider putting the indoor unit near the sleeping area so that when the heat from the ground rises, you will be cool sleeping at night. Some tiny homes incorporate a door for these private lofts, which often double as sleeping areas. A duct chase allows air to get into that room while the door is shut. Jones added that the floor gets the coldest, even if the tiny home is outfitted with skirting. Therefore, you may want to have a separate heating source on the ground.
What to Consider When Selecting a Unit Electrical Requirements: 110-220 volt
Space: 1 foot high, 4 feet wide wall-mounted unit
Cost: – High-End: $8,250 – Midrange: $5,600 – Budget: $1,800
Installation: $2,000
Maintenance: Low
Preferred Climate: Any
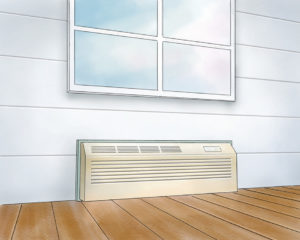
Through-the-Wall Unit (TTW)
At a Glance:
- Single package, also known as a window unit
- Cheap to buy and easy to install
- Operate by blowing air over heated or cooled coils
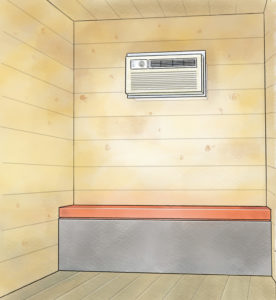 Commonly referred to as a “window unit”, this type of air conditioner spans a section of wall such that the unit’s cooling side faces the interior of the room, and its exhaust side vents to the outside. However, there is a critical difference between models. On some models you will notice that the vents where the air is exhausted are not only on the front and back, but on the sides as well. In that case, placing it in a wall so that the side-vents are blocked is ill-advised and a costly mistake. This type of unit is essentially a large, cold fan. They operate by blowing air in an undirected cone shape over heated or cooled coils. Because of this simple exchange, TTWs are one of the most inefficient units on our list. If your ceilings are high or the space is unusually wide for a tiny home, there is a good chance that one side will feel different than the other. Through-the-wall-units are one of the cheaper options, and do not require more than 2 people to install. But they will use a high amount of energy each month to keep your tiny home comfortable. Some people like the noise-blocking quality of a humming through-the-wall unit. Others may find they want to hear the nature around them. It is common for these units to break down, and develop a rattling sound.
What to Consider When Selecting a Unit Electrical Requirements: 115 (on the low end) to 240 volts
Measurements: 15 inches high x 25 inches wide x 20 inches deep
Cost: – High-End: $600 – Midrange: $500 – Budget: $400
Installation: $100-150
Maintenance: Low
Preferred Climate: Warmer
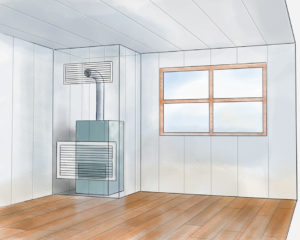
Wood Stove
At a Glance:
- Dual utility: cooking and heating
- Requires range hood and air exchanger
- Cast-iron or welded; catalytic or non-catalytic
- Creates a favorable ambiance
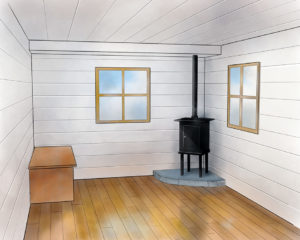 Given that your tiny home does not have a lot of space, a wood stove can be a good option for both heating AND cooking. There are two main types of wood stoves: cast iron and welded stoves. Cast iron stoves have natural curves, and are a little more attractive, but they need to be rebuilt after a couple of years. The welded stove is cheaper and more basic. Both of these options are handsome and set a favorable ambiance in your tiny home. Additionally, you’ll have to choose between a catalytic and non-catalytic combustion technology. The catalytic combustion has better heat output and a smoky exhaust that passes through a ceramic honeycomb. The non-catalytic version combusts in the firebox. Both can heat your tiny home, but the non-catalytic version is likely a better option since air comes in through the stovetop. The non-catalytic version also will need parts repaired after many uses (two-three moderate winters).
Depending on the model, a wood stove can provide heat ranging from 25,000-80,000 BTUs. The larger wood stoves are able to spread throughout an area heat up to 1,600 ft, far above the average size of a tiny home. You will need to install a range hood or else your windows will sweat and fog. Moreover, you’ll need to keep air moving throughout the house. This can be achieved by either a fan or an air exchanger. One thing to keep in mind is what type of tiny home you have. For instance, the tiny homes at Tumbleweed Houses are actually certified RVs. “Since none of the wood burning stoves on the market are RVIA [Recreational Vehicle Industry Association]-certified, we cannot install a wood burning stove,” said Sophia Dondi, with Tumbleweed Houses. Make sure you check with local regulations to make certain you aren’t in violation of any codes when considering a wood burning stove.
What to Consider When Selecting a Unit Electrical Requirements: Zero
Space: 3 feet by 3 feet, plus chimney
Cost: High-End: $3,000 Midrange: $2,000 Budget: $400
Installation: $700-900
Maintenance: Medium (must rebuild cast-iron models)
Preferred Climate: Cold
Portable Air Conditioner
At a Glance:
- Unit contained in one package
- Can be used alone or to supplement other units
- Requires hose sticking through window
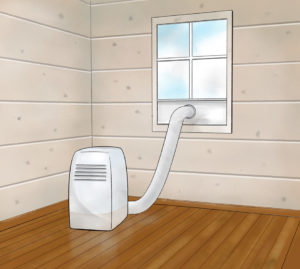 These units are portable and can be moved from room to room. Common in office buildings and small places, they work well as a supplement method to heat and cool your tiny home. As with the other options, some models come with heating elements for year-round portable comfort. Like the TTW unit, portable air conditioners are not the most efficient way to heat or cool your tiny home. These units work as a kind of fan, spraying air in an undirected cone. This type of air flow may prevent even heating and cooling in extreme climates. Many of these models must have an exhaust tube running from the air conditioner in order to push out the air that was unable to be conditioned. There are single-hose and double-hose options. The double-hose option is probably your safest bet. One hose works to exhaust the air out of your tiny home, while the other hose brings air in—this prevents a negative air pressure, which is many users complaint about the single-hose versions.
What to Consider When Selecting a Unit Electrical Requirements: 115 volts
Measurements: 2×3
Cost: – High-Class: $500 – Midrange: $350 – Budget: $250
Installation: $0
Maintenance: None
Preferred Climate: Mild
Packaged Terminal Air Conditioner (PTAC)
At a Glance:
- One contained unit
- Common in hotels
- Some have a resistive electric heating element instead of a heat pump
- Durable
 There’s little doubt that you’ve encountered a PTAC. Primarily found in hotels, dorm rooms, hospitals, and apartment complexes, these units are rectangular, typically off-white and installed in a metal sleeve under a window. They are controlled with a digital thermostat or a set of knobs on the device— and always seem to be set on a ridiculously low temperature. Most common are the electric variety that use resistive electricity for heating, but some are equipped with heat pumps too. If you purchase a PTAC with only the resistive electric heating element, your electric bill will run higher each month, but the upfront cost for purchasing the unit will be cheaper. See section 3, Electric Heating, for more details. PTAC units have air-conditioning capabilities as well. Unlike a mini-split system, a PTAC gives you control of all your climate needs in one “package.” The evaporator, condenser, and coils are not separated. PTACs can last up to 10 years if regularly maintained; however replacement every 5-7 years may be recommended for environmental sustainability.
What to Consider When Selecting a Unit Electrical Requirements: 208/230 volts minimum
Measurements: 16 inches high, 3.5 feet long
Cost: – High-End: $1,500 – Midrange: $700 – Budget/Refurbished: $300
Installation: $350
Maintenance: Low
Preferred Climate: Any
Vertical Terminal Air Conditioner (VTAC)
At A Glance:
- Out-of-sight
- All-in-one packaged unit
- Quiet
- Expensive initial cost
 Vertical terminal air conditioners are installed out of sight in closets or another space hidden from view. As such, they can only be controlled by a thermostat or a remote controller. One potential drawback is the amount of wall space and the size of a closet needed in order to install a VTAC in a tiny home. VTACs work in the same way that the other HVACs do. They use a combination of a heating element, condenser, evaporator, and coils to get the refrigerant cycle operating. Most comparisons of a VTAC center around a PTAC, as these are often used in hotels. These units tend to be quiet since they are tucked away from sight. However, this may not hold true in a tiny home where things are much closer together. If you are particular about your home’s aesthetic, and don’t like the idea of having an evaporator mounted on the wall, then this could be a good option. Keep in mind that these are some of the most expensive options upfront.
What to Consider When Selecting a Unit Electrical Requirements: 208/230 volts
Measurements: 20 inches wide by 20 inches deep by 66 inches tall, out of sight.
Cost: – High-End: $2,800 – Midrange: $2,000 – Budget/Refurbished: $1,600
Installation: $500
Maintenance: Medium
Preferred Climate: Any
Central Heating and Air
At a Glance:
- Split-system made up of two parts
- Requires ductwork and vents
- Versatile
- Variety of models
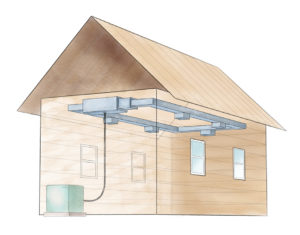 Central heating and air conditioning comes in two types: a split-system, or a packaged unit. The split-system is, well, split. In an air conditioning unit the condenser and compressor sit outside in a metal sleeve, while the evaporator is mounted inside an indoor cabinet, closet, or attic. Usually a furnace or the indoor component of a heat pump is also stored inside this cabinet. In a packaged system the compressor, condenser, and evaporator are all in one packaged unit outside- usually on a concrete slab, or perhaps on the roof. You’ve likely seen these all your life. They transfer air throughout your house using a system of ductwork. While the installation of ductwork may cost more up front, it does distribute airflow evenly throughout the entire space. If air is lost through ductwork, your unit will have to work harder to heat or cool your home.
What to Consider When Selecting a Unit Electrical Requirements: 220/240 volts
Measurements: dependent on system chosen- split-system or packaged
Cost: – High-End: $2,500 – Midrange: $2,000 – Budget: $1,400
Installation: $1,000
Maintenance: Low
Preferred Climate: Any
Energy Effective Strategies
Defining the efficiency of a heating and cooling process requires setting the boundaries of the system to be considered. The “system” in this case is a tiny home. There is an important difference between the overall efficiency of heating effect per unit of electric energy and the transmission of that energy.
Air Transmission
If an HVAC model transmits air throughout your tiny home evenly, then it is more efficient than a model that only transmits air in one section. This is why Portable Air Conditioners and Through-the-Wall Units are considered energy inefficient- they blast air in an undirected manner. Normally this air does not leave a single room. Compare that with a Central Heating and Air system, which implements ductwork to evenly distribute air throughout multiple rooms in a home. A tiny home is typically only one room, so air can be transmitted throughout the tiny home in an even manner by any properly rated HVAC. However, this is not the case for lofts with sliding doors, bathrooms, or any other doored room in the home.
Insulation
Once your heating or cooling unit has worked hard to get your tiny home to the desired temperature, insulation acts as a buffer to maintain that temperature. The unit will kick back on and work to reach the desired temperature again. Good insulation can keep the unit from cycling through its heating and cooling processes by slowing the loss of conditioned air from the home. “Investing in good insulation will make a big difference in keeping the temperature you want in your small unit, as well as saving on electricity,” said Wen, who works for ShopTinyHouses.com. We spoke with Randy Jones, the owner of Incredible Tiny Homes about the issue. He said he previously used fiberglass insulation for years. His strategy was to use R-19 insulation in the floors and ceilings, and R-11 or R-13 in the walls. Despite positive customer feedback from the use of this insulation method, he became interested in closed-cell spray foam, which is much thicker and less porous. This greatly reduces the chance that condensation will build up, leading to issues with spores, and ultimately mold.
“No air gets through, we had to install an air exchanger just to filter stale air out of the house,” – Jones told us.
He sprays the entire home: floor, ceiling, and walls. One of his spray foam clients in Florida kept track of her utility costs over the course of a year. She never paid more than $20 for her electric bill in the dead of summer. This particular home, says Jones, had a large cubic volume due to 11-foot ceilings and was equipped with a ductless mini-split.
Skirting and Windows
Another consideration Jones talked about is the installation of skirts around the bottom of a tiny home. Tiny home floors are notorious for getting cold from wind blowing underneath the home, since they are often seated on trailers. This is true even if the floors are insulated. Skirts can block the wind, diverting it from brushing against the bottom of your tiny home. When it comes to windows, a single pane of glass will allow more energy to pass through than two panes of glass. Thermal glass windows are made up of two and sometimes three panes of glass thick, each separated by a space filled with insulating gas. That is some serious insulation.
So there you have it. You now have a solid understanding of the considerations you need to account for as you decide the best heating and cooling method for your tiny home.
There are many options for heating and cooling your tiny home. We know it can be hectic having a plethora of tabs open in your browser, only to find out you haven’t really considered every factor in heating and cooling your tiny home. Here’s a quick reminder of the steps needed to determine which heating and cooling system to use in your tiny home:
- Calculate your home’s square footage and match its size to the appropriate BTU heating and cooling capacity.
- Based on your geographical location and its average high and low temperature ranges, as well as your budget, determine what EER/SEER rating you’ll need (and can aff0rd). Keep in mind that the higher the SEER rating, the more expensive the unit.
- With your numbers in hand, evaluate the options laid out in this guide to find the unit that’s right for your home, locale, and budget.
- If professional installation is required for the type of unit you choose, find a contractor who can assist with the install. Remember, some of these units require higher voltages, so consult a licensed electrician before you do any wiring work.
- Purchase and install your unit. Keep in mind it may also be cheaper for the contractor to actually buy the unit, as they often have access to special pricing.
- Sit back, relax, and enjoy your perfectly comfortable tiny home!